Disintegration Effect: Photoshop Tutorial


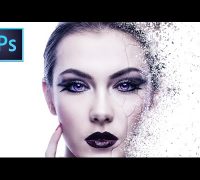
In today’s step by step Photoshop tutorial. We will be learning how to create a Disintegration Effect. We will be focusing on adding the disintegration effect by using “particle” Photoshop brushes, Masks and the Liquify tool. We also we will adding a cracked texture and blending/warping it to look as if it’s wrapping around her face. I will also be using the Camera Raw filter a little bit and adjustment layers to make the color of the image really stand out. For the final step I will show you how to make the model eyes stand out immensely. Hope you enjoy. Don’t forget to leave a like! ๐Ÿ™‚

Download this tutorial: http://bit.ly/1SYeFHq

STOCKS
http://www.photoshoptutorials.tv/tutorials/create-disintegration-effect-in-photoshop/

Subscribe: http://goo.gl/VrB6Lu

Stay Connected:
Google+: http://goo.gl/Oa1Ygp
Facebook: http://goo.gl/8MtLbZ

Audio Provided By:
https://www.youtube.com/audiolibrary/music

How to Get Started With Adobe Photoshop CC – 10 Things Beginners Want To Know How To Do


In this episode of Adobe Creative Cloud TV, Terry White shows you how to get started with Adobe Photoshop CC and covers the 10 things that beginners want to know how to do. If you’re new to Photoshop, this is the video you’ve been looking for!

Follow me on Twitter: http://twitter.com/terrylwhite
Like me on Facebook: http://facebook.com/terrywhitefans
Follow me on Instagram: http://instagram.com/terryleewhite
Follow my blog: http://terrywhite.com

Tools Used to Make My Videos:
Adobe Creative Cloud: http://adobe.com/creativecloud
Screen Recording Software: http://terrywhite.com/i-use-screenflow/

Photography Equipment – Whatโ€™s in My Studio: http://terrywhite.com/studio
Mobile Live Streaming Kit: http://twhite.me/scopekit

Skin Retouching Photoshop Tutorial

brb.


http://www.facebook.com/sarakieslingphotography

Basic skin retouching using frequency separation and dodging & burning. I use this process on every photo that I do, and I usually spend about 4-5 minutes on headshots like this (and less time on full body shots when there is obviously less detail in the face). This is not intended to be a high-end retouching tutorial – but techniques that can help people who want to do natural-looking retouching while maintaining most of the natural skin texture!

Here is the final photo – http://www.flickr.com/photos/xosara/6122295521/

The final editing was done with one of my Photoshop actions, available at http://www.sarakiesling.com/actions ๐Ÿ™‚